
Imagine a dessert so divine, it feels like a dream come true. The Easy Chocolate Cream Pie is more than just a treat; it’s a masterpiece of flavors that combines the richness of chocolate and the smoothness of cream in one perfect pie.
Thank you for reading this post, don't forget to subscribe!With its creamy texture and decadent taste, this pie is a crowd-pleaser that’s as easy to make as it is to enjoy. Whether you’re using a homemade or store-bought crust, the result is a dessert that looks and tastes like it was made by a professional.
The best part? It’s incredibly simple to prepare. With just a few ingredients and some chilling time, you can create a dessert that’s sure to impress your family and friends. The filling sets perfectly, and the whipped cream topping adds a delightful finish to this chocolate lover’s dream.
Ready to create your own masterpiece? Let’s dive into the step-by-step guide that will take you from crust to garnish, ensuring every bite is nothing short of perfection.
Key Takeaways
- A perfect blend of chocolate and cream for a rich dessert experience.
- Quick and easy preparation with minimal ingredients.
- Works with both homemade and store-bought crusts.
- Chilling time ensures the filling sets to perfection.
- Whipped cream topping adds a luxurious finish.
- Step-by-step guide for a flawless baking experience.
Introduction to Your Easy Chocolate Cream Pie
Discover the charm of a dessert that combines the richness of chocolate with the smoothness of cream. This recipe offers a luxurious treat that’s both practical and indulgent. Inspired by a modified microwave chocolate pudding, it ensures a quick and delicious outcome.
Discovering the Chocolate Dream
The idea of creating a decadent chocolate cream pie began with the quest for a dessert that’s both rich and effortless. By using a microwave chocolate pudding as the base, the filling is prepared in minutes, making it a time-saving delight. This approach ensures a creamy texture without the hassle of traditional methods.
What Makes This Recipe Special
This recipe stands out for its simplicity and depth of flavor. With a variety of crust options—homemade, graham cracker, Oreo, or store-bought—you can choose what suits you best. Proper mixing and timing are key to achieving the perfect texture, making each bite a delight. Compared to other chocolate treats, this pie holds a special place due to its balance of taste and convenience.
| Feature | Details | Benefits |
|---|---|---|
| Filling | Modified microwave pudding | Quick preparation, smooth texture |
| Crust Options | Homemade, graham cracker, Oreo, store-bought | Versatility and convenience |
| Texture | Proper mixing and timing | Perfect balance of cream and chocolate |
Ready to create your masterpiece? This guide simplifies every step, ensuring a flawless and enjoyable experience.

Ingredients & Tools for Your Easy Chocolate Cream Pie
Before you start crafting your masterpiece, gather all the necessary ingredients and tools. This ensures a smooth and enjoyable baking experience.
Essential Ingredients
To create this delightful dessert, you’ll need:
- 2 cups of whole milk
- 1 cup of heavy cream
- 4 large egg yolks
- 3/4 cup of granulated sugar
- 1/4 cup of cornstarch
- 2 tablespoons of unsweetened cocoa powder
- 4 ounces of high-quality baking chocolate
- 4 tablespoons of unsalted butter
- 1 1/4 cups of all-purpose flour (for a homemade crust)
- 1/2 cup of cold unsalted butter (for a homemade crust)
For the whipped cream topping:
- 1 cup of heavy cream
- 1-2 tablespoons of powdered sugar
- 1 teaspoon of vanilla extract
Must-Have Kitchen Tools
To simplify the process, ensure you have these essential tools on hand:
- A 9-inch pie dish
- A microwave-safe bowl
- A hand mixer or whisk
- A food processor (for homemade crusts)
- A measuring cup and spoons
Using quality ingredients, such as Dutch-processed cocoa powder and real baking chocolate, will elevate the flavor of your pie. Store your ingredients properly to ensure freshness.

With these ingredients and tools ready, you’re set to move on to preparing the perfect pie crust.
Preparing the Perfect Pie Crust
Your pie crust is the foundation of a memorable dessert. Whether you prefer a homemade, graham cracker, or Oreo crust, each option offers a unique texture and flavor to complement your filling.
Homemade Pie Crust
A homemade crust provides a traditional, flaky texture. Mix flour, butter, and water to form a dough, then chill it before rolling out. This method allows for a personal touch and a classic feel.
Graham Cracker Crust
For a quicker option, graham cracker crusts are ideal. Crush crackers, mix with melted butter, and press into a pan. Bake until lightly browned for a crunchy base that’s ready in minutes.
Oreo Crust
Oreo crusts add a cookies-and-cream twist. Crush 24 Oreos, mix with butter, and press into the pan. Bake at 350°F for 12 minutes for a crisp, chocolatey base.

Blind Baking Tips
Prevent a soggy crust by blind baking. Line with parchment paper, add pie weights, and bake at 350°F for 12 minutes. This ensures a golden, firm base for your filling.
A perfectly baked crust sets the stage for a divine dessert. Avoid overbaking and ensure even pressing for a flawless foundation that enhances every bite.
Making the Luscious Chocolate Pudding Filling
Creating a smooth and rich chocolate pudding filling is the heart of this recipe. With precise steps, you can achieve a velvety texture that enhances the overall dessert experience.
Tempering Eggs and Achieving a Smooth Mixture
To ensure a silky pudding, start by whisking together sugar, cornstarch, and cocoa powder with milk. This creates a smooth base. Next, temper the egg yolks by gradually adding the warm milk mixture while whisking continuously. This step prevents the eggs from scrambling and ensures a uniform texture.
Microwave vs. Stovetop Techniques
The microwave method offers convenience, cooking the mixture in 3-minute increments until it thickens, typically within 10 minutes. For stovetop, heat the mixture over medium heat, stirring constantly, until it bubbles and thickens. Both methods require patience and constant stirring to avoid lumps.
Final Touches
Once the pudding is cooked, stir in chopped chocolate, butter, and vanilla extract until fully incorporated. This enriches the flavor and ensures a glossy finish. The mixture is now ready to pour into your pre-baked crust and chill until set.
Assembling and Chilling the Pie
Now that your filling is ready, it’s time to bring everything together. This step is crucial for achieving the perfect texture and presentation.
Pouring the Filling into the Crust
Start by carefully pouring the hot pudding mixture into your pre-baked crust. Make sure to do this gently to avoid creating air bubbles or disturbing the crust. If you notice any air bubbles, you can gently tap the pie dish on the counter to release them.
Refrigeration & Setting the Perfect Texture
Let the pie cool at room temperature for about an hour. This allows the filling to begin setting. After cooling, refrigerate the pie for at least 4 hours, or preferably overnight, to ensure it sets properly. The longer it chills, the firmer and creamier it will be.
If the filling seems too runny after mixing, don’t worry. It will thicken as it chills. Just make sure to cover it tightly with plastic wrap to prevent air from reaching the surface.
When the pie is set, it should not jiggle when you gently nudge it. This is your sign that it’s ready to serve. Patience is key here—the wait is worth it for a perfectly textured dessert.
Once the pie is well-chilled, your preparation work is done. All that’s left is to present it beautifully and enjoy the delightful experience you’ve created.
Serving Suggestions and Garnishing Ideas
The final touches can elevate your dessert from great to extraordinary. Whether you prefer classic elegance or creative flair, these ideas will help you present your Easy Chocolate Cream Pie in style.
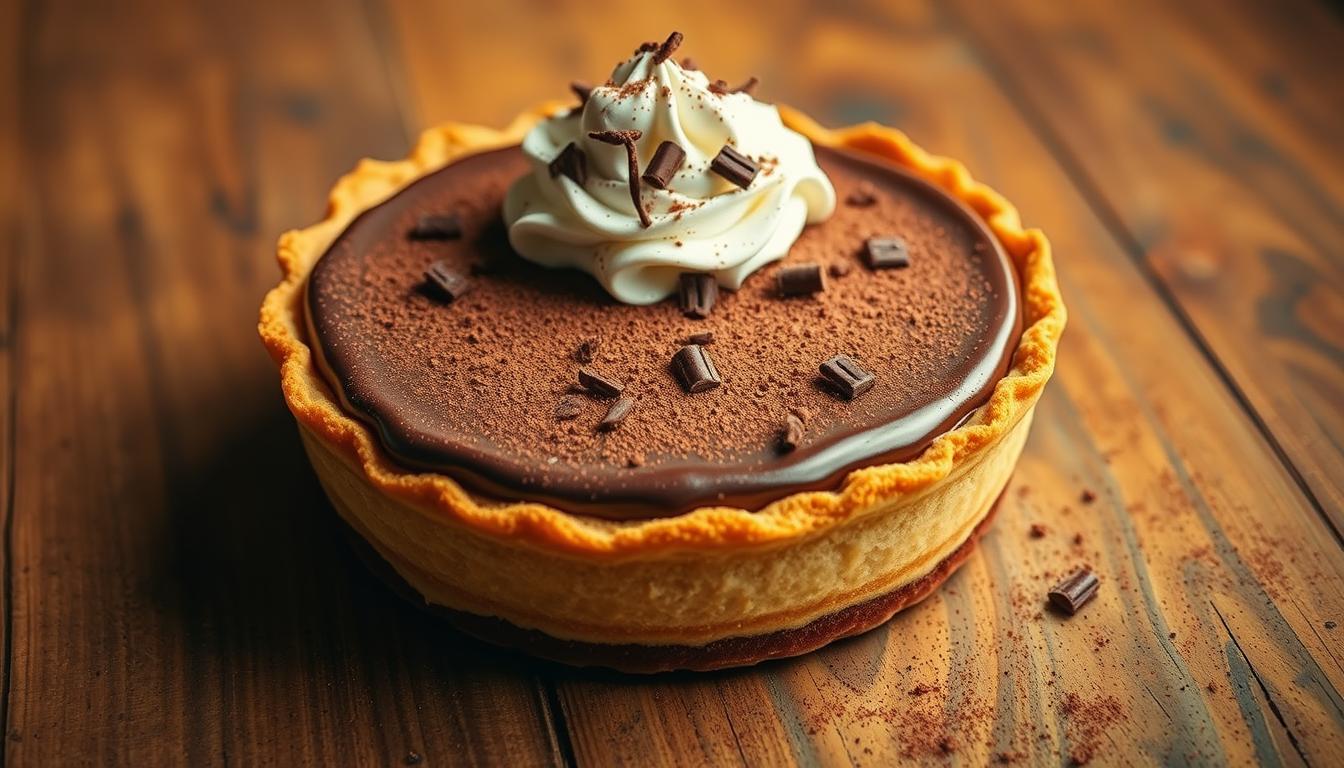
Whipped Cream and Fresh Chocolate Accents
Top your pie with a dollop of freshly whipped cream infused with a hint of vanilla extract. To make it, whip heavy cream with a tablespoon of powdered sugar and a teaspoon of vanilla extract until soft peaks form. This adds a light, airy contrast to the rich filling.
Creative Variations for a Personal Touch
Consider adding fresh chocolate shavings or curls on top for a decadent look. You can also dust the pie with cocoa powder or a pinch of cinnamon for a unique twist. For special occasions, drizzle with chocolate sauce or sprinkle with edible gold dust.
| Garnish Ideas | Description | Benefits |
|---|---|---|
| Whipped Cream with Vanilla | Whip heavy cream with sugar and vanilla extract | Adds a light, sweet contrast |
| Chocolate Shavings | Shave high-quality chocolate over the top | Enhances chocolate flavor and texture |
| Cocoa Dusting | Dust with cocoa powder | Creates an elegant, professional look |
These simple yet creative touches will make your Easy Chocolate Cream Pie a standout dessert. Whether you keep it classic or get inventive, the result is sure to impress!
Conclusion
With its rich flavor and smooth texture, this chocolate cream pie is a dessert that’s as satisfying to make as it is to enjoy. By following the simple steps and using everyday ingredients, you can create a masterpiece that impresses both in taste and presentation.
Remember, the key to success lies in careful preparation—from crafting the perfect crust to achieving the ideal pudding consistency. Don’t forget to explore creative garnishing ideas, like whipped cream or chocolate shavings, to give your pie a professional touch.
Even on busy days, this recipe remains accessible and rewarding. Share your creations and variations—this timeless dessert is a must-try for any chocolate lover. Keep experimenting and having fun in the kitchen!
Finally, store your pie in the refrigerator for up to 4 days to maintain its freshness and appeal. Enjoy every bite of this delightful treat!